Knowledge Drain

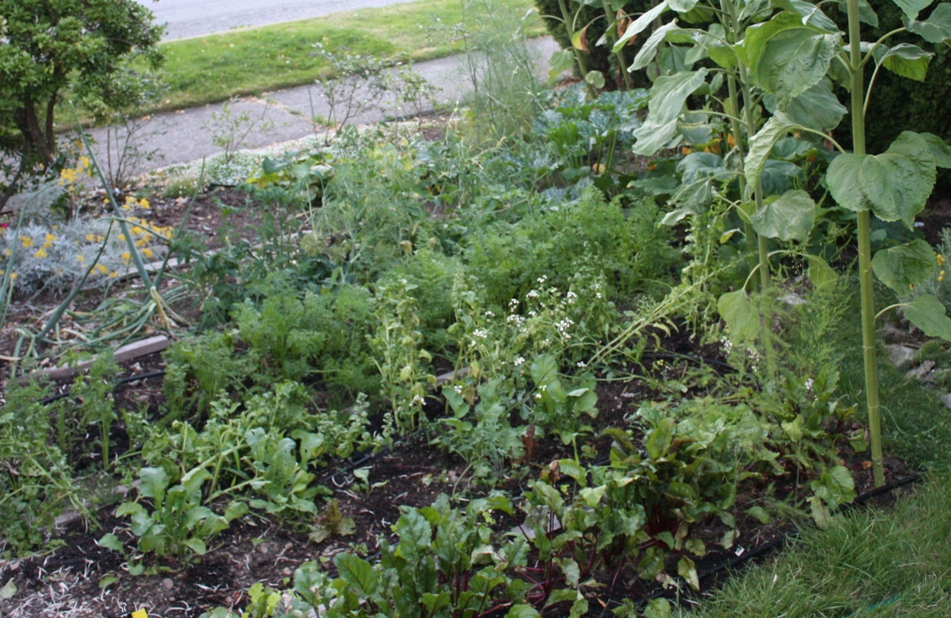
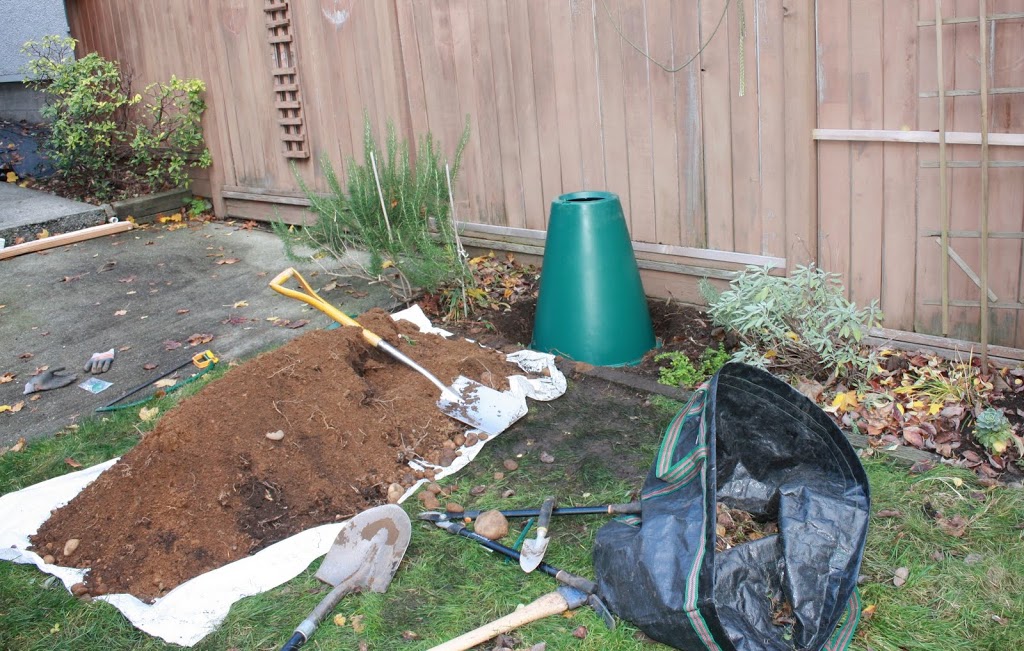
This long weekend is full of little tasks. Besides a little volunteering at the Westcoast Curling Classic, I did a bunch of tasks that are the opposite of Spring Cleaning: harvesting plants, putting compost on the garden, and putting away the potting soil in the deck pots that produced so many tomatoes and peppers this year.

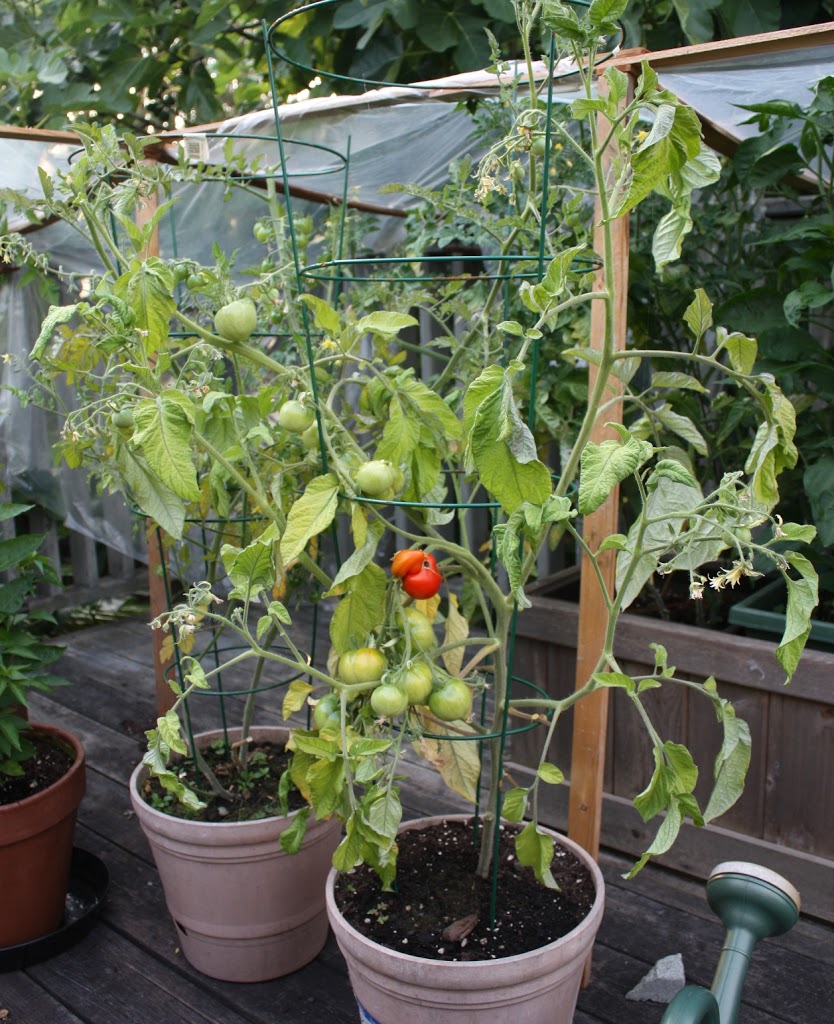
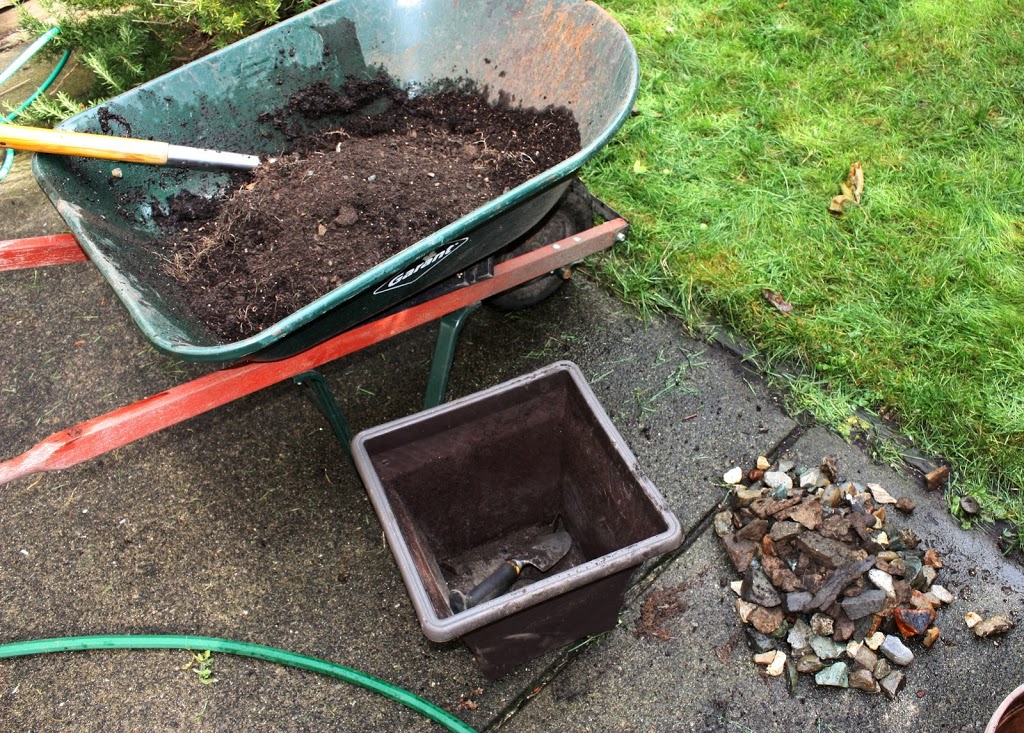
Part of that last task is separating the soil from the drain rock I use at the bottom of the pots. It got me thinking about how our veggie plants are benefiting from our education. More directly that you might expect: my drain rocks are mostly rock samples collected during thesis work by me, or by my better half.

My Master’s thesis was a pretty old-school map-the-geology type thing. I spent probably the most idyllic summer fieldwork season even mapping a bunch of little islands off the east costs of the Saanich Peninsula, and a bit of the Peninsula itself. You can read the abstract here , or even download the entire 260MB bastard in pdf. I would highly recommend against that, unless you find ichnofacies analysis to be compelling, but it does include a lot of pretty diagrams I drew myself!

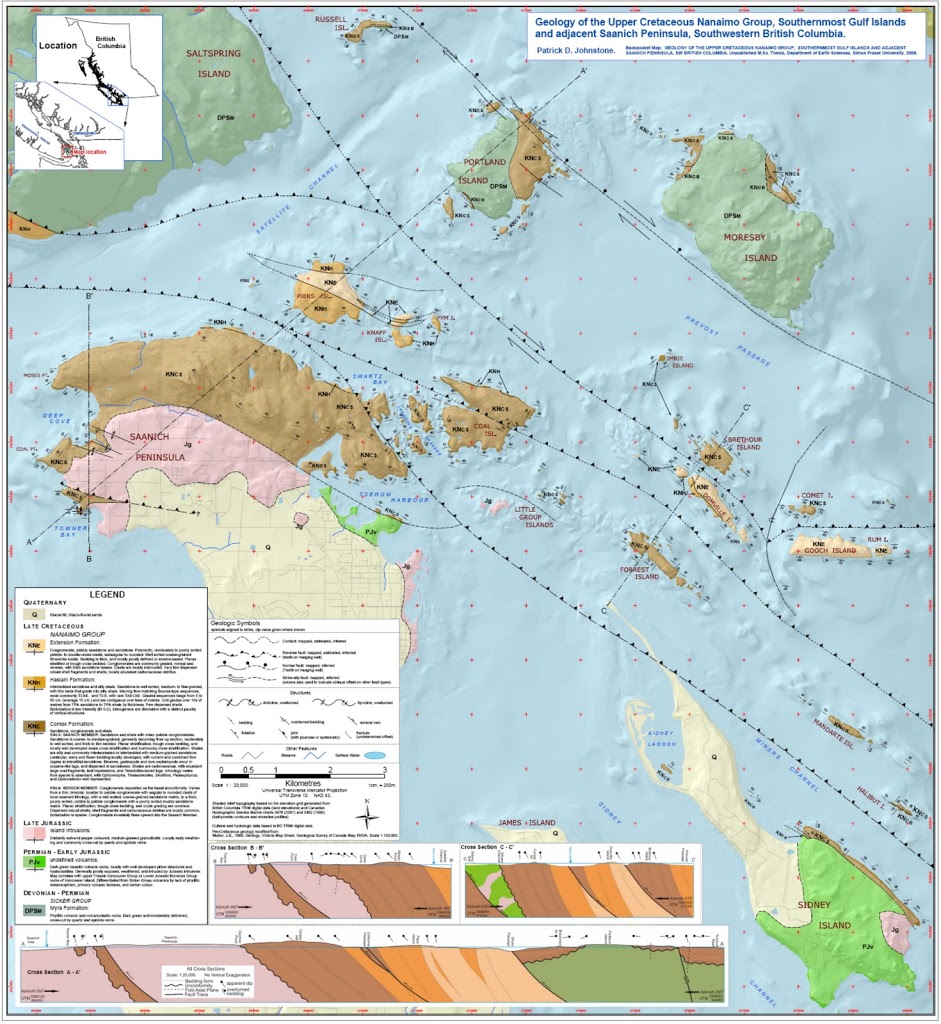
Three years of my life: zoom to enrage.

During the summer, I collected a lot of rock samples. Some to serve are representative hand samples for future comparison, some to cut into thin sections to do petrology, some because they contained fossils (my not being a palaeontologist, I need to look them up or ask someone smarter than me to identify them); and some just because they looked cool.

The Smart One in the Family had a different type of thesis. She was up in the interior of BC looking at glacial deposits, and trying to decipher patterns in the deposits to figure out which way the ice flowed at what time, and concomitant to that, where gold or other lucrative minerals might be found under the glacial deposits based on evidence smeared out within the surface deposits.

Aspects of her thesis relied on statistics to tease trends out of seemingly random data. To do that, you generally need to start with a lot of very meticulously collected data. One line of evidence she used for ice flow was collecting samples of pebbles from glacial till, and characterising the pebble types to see if there are patterns across space. To have adequate statistical support, she needed to collect 100 samples (using a randomising selection method) from each site. To provide adequate statistical control over these sites, she needed 100 sites. So she collected, and petrologically described, 10,000 pebbles. Compared to my couple of buckets of samples, this was a monumental task, and it was only one aspect of her thesis. It is clear which of us is the geologic stud.

So what to do with 10,000 pebble-sized samples, and thousands of others, once your thesis is done?

A few years after her defence, I took a couple of 20L pails of pebbles and mud samples (used for geochemical analysis) that were kicking around a lab at SFU and dropped them in a persistent pothole puddle on the North Road Trail on Burnaby Mountain – every time I ride my mountain bike around that (to this day, puddle-free) corner, I think about the rocks there, and what an enterprising geologist would make of all these Adams Plateau pebbles on Burnaby Mountain.

Some of my samples were pretty enough that they are around my garden today. Some of her samples were used to make patio tiles by her Mom, as part of a family-themed patio paving project.

However, a combined ~17 years after our thesis defences, we still have a few 20-L buckets of pebbles, samples, off-cuts, and fossil samples kicking about. Averse to throwing things out (much to her chagrin), I am always trying to find uses for them… This is how the drainage rocks in our veggie pots came from the Gulf Islands and the Adams Plateau. I think this makes them cooler than a $4.99 bag of crushed quartzite drainage rock I could buy from Home Depot. Especially when I find a nice polished piece of sandstone with a Sharpie-lettered sample number on it. Memories of that summer in the bottom of my veggie pots.. oh, look, there is good ol’ sample PDJ04-107a. That was a nice spot. 

Bugs in the Garden – UPDATE

This has been a tough year for the garden. A cool wet spring had a lot of our seeds dying in the ground. The weather also brought us slugs, snails, and aphids. The first crop of lettuce expired, as did the first attempt at carrots. The beets and radishes got eaten by slugs. Radishes wormed-through. I am a terrible gardener.
??

By the Middle of June, not much was happening. Besdies the Garlic and the two “vounteer” potatoes, everything seen was transplants sprouted inside.

??Besides the weather, a constant issue in my garden is the combined aphid-ant battle. I learned last year that some species of ants actually farm aphids. The aphids apparently take more sugar-filled sap out of some plants than they can digest, so they…uh… pass a very sugar-rich waste that the ants harvest. Ants “milk” the aphids like we do cows. This is so successful that the ants have actually learned to farm the aphids. They move small aphids from one part of a plant to another to spread around the feeding space, they even defend the aphids from predators. My attempts to dissuade the ants from my plants, using tanglefoot on my blueberries, and diatomaceous earth on my sunflowers, were to no avail. Using a spray-bottle or water to knock the aphids off was pretty effective, until the ants replaced the lost flock with more young aphids. I just don’t have the time to do it every day. I’m a terrible gardener.

Ants and aphids working together to kill my bluberry plant. (click to zoom).

The problem with using anything more powerful (even insecticidal soap) is that it tends to knock down the natural enemies that control aphids and ants and other pests. The natural enemy of the aphid is the lady bug. So every time I see a lady bug in the garden, I know it is on my side. My experiences with ladybugs this year have included the whole life cycle.

Back in June I found a bunch of ladybug eggs on one of my sunflower plants:

Not long after, I found a bunch of freshly-hatched ladybug larvae on a leaf on my pepper plants:

Problem is, my pepper plants are amongst my tomatoes on the hot back deck, and the only two plants not being nuked by aphids. So I took matters into my own hands. I clipped the leaf off the pepper plant and attached it with a twist-tie to an aphid-infested blueberry plant in my front yard. I hoped the larvae would find a quick bounty, and stick around the garden patch where they were most needed.

That is where I learned about the ants and their defensive skills. 10 minutes after moving the leaf, there were a half dozen ants on the leaf, attacking the freshly hatched larvae. Oops. I moved the leaf to safer spot, and hopefully some of them survived! When they get big enough to defend themselves, the larvae are pretty cool looking:

And I can announce now that the weather has turned, there is a good population of ladybugs in my garden, and the aphids are almost gone completely. I still see a lot of ants around, and the sunflowers seem to have some aphids, but they are big enough to defend themselves, and they seem to be just populous enough to keep the ladybugs fed.

Oh, and now that the weather has turned, the garden is booming. Too late to get too much off the tomatoes this year I expect, but the beets, carrots, cukes and zuchs, the garlic, the blueberries, the potatoes and the onions seems to be going gangbusters, and the herb garden is loving the summer. We may even get a pumpkin to survive. Unfortunately, lettuce has been hit-and-miss this year, after a really successful last season. I really don’t know what I am doing. It sure is fun learning.

It looks like about two weeks until Fig Season, the greatest week of the year.

I am also taking part in a community science project being sponsored by Douglas College’s Institute of Urban Ecology, but I’ll talk about that later. If you are on Facebook, you can check it out now.

First update: That picture at the top shows what the garden was like inJune, with the late start, here is what it looks like now:

Second Update: I did a little research into Lady bugs, and I am supposing that little bug I photographed above is actually not a native ladybug, it is likely Harmonia axyridis, or a Japanese multi-colour ladybug. OK, because they eat a lot of aphids. but bad because are apparently displacing native species that might be better adapted to our climate. An interesting peice of background on native vs. introduced ladybugs. good reading!.

Windows, part 4

One of the items that is pottentially included in the soon-to-be-renewed Conservative budget was an extension of the energy efficiency retro-fit program for residential homes. This is, IMHO, a pretty good program, in that it is not a direct subsidy, but is a tax benefit to those fortunate enough to have extra income and willing to spend some of it on reducing their energy use, as opposed to making “home improvements” that do not result in efficiency gains or pissing it away on more plastic toys. In that sense, it is both a tax break for the rich (So Steve is happy), and it helps the less than rich save a little money in home heating. It is about the only nod to the environment in the entire Tory platform.
Regular readers of this blog (Hi Mom!) would know that I took advantage of the combined federal-provincial efficiency program to have an energy audit done on our 1940 house, and came up with a priority list for efficiency improvements. We decided to look at replacement windows, and a few small other improvements mostly around improving sealing at a few key spots. I talked earlier about our decision to get new windows, about our options, and about our foray into the consumer replacement window market. Now I get to talk about the windows we bought.
As I discussed earlier, the shopping for windows was complicated by my interest in high energy efficiency, and The iCandy’s interest in protecting (or even improving) the look of the house with the windows. In the end, the only way we were going to solve this was by getting wood windows. That was when we met Jordan, the owner of Sashmasters.

Again, as I blogged a few months ago, Jordan was anything but high-pressure sales. He took the time to look at our windows and honestly assess our options. He was straight-forward about what would and wouldn’t work in our house, and even had some useful advice about how to approach some of the windows we didn’t really know how to deal with (such as the ugly 80’s re-fits in our basement suite). Then he gave us a quote.

To be honest, it was a little more than our budget, and The iCandy chewed him down a little (she is a tough negotiator), but it was an honest price. After the fact, I can attest that there were a few minor issues that cropped up during install, and he never took those as an opportunity to play the “out of scope” card for our budget: he got the job done on budget. He also committed to making me happy within the budget, and set a price that would allow me to pick the glazing options I wanted (double-pane, argon filled, low-e glass), even including laminated security glass in one of our more accessible windows. So we dipped deeper into our line of credit, and pulled the trigger.

?

(you can click and zoom into any picture)

?

There were a lot of positives going in. They were a local company, based in Burnaby. They used Canadian Douglas Fir from BC mills, and a glass supplier from Coquitlam. Prior to purchase, we did a quick tour of his manufacturing facility in Burnaby, and he walked us through the window-making process. We got to meet some of the guys who would be making our windows, and the shop dog. Somehow, it always feels better writing a cheque in a local manufacturing plant than it does dropping plastic on the counter at Home Despot. And it is cool to see a raw window frame with your name on it (see left).

Also, since every window in Jordan’s shop is custom, he was able to find solutions for many of our windows that none of the other Sales folks could. There is a big manufacturer of wood windows (rhymes with Fella) whose kludged approach to two small windows in our living room would have reduced the glass to about the size of a CD case. Jordan was able to make a unit that fit great, preserving the original look of the windows. He also allowed us to do some creative leading of our main picture window and a few of the other windows, to maintain the original look of the house.

Once the deal was done and the designs were set up, Jordan started making windows. We were again lucky to be able to go to the shop and see our windows being made:

Jordan even walked us through the process, from 16-foot planks of Fir he buys from the sawmill to the planer, the cutting of the complex joints, the gluing of joints with hydraulic clamps, the sanding, staining, painting, the complex process to put leading in double-pane windows. It was fun to see. You can get a sense by going to his website and following the “shop photos” slide show.

Here is the sequence for our kitchen windows (that had been previously replaced with rather drafty plastic units):

?

Before, drafty 80’s era replacement windows

?

?

Here is The iCandy with the new frames at the shop:

?
????????

Here they are part way through installation. This was a slightly complicated install, as the previous replacement wasn’t exactly optimum, so they had to re-manufacture some of the wall.

?????????

…and as the kitchen looks tonight.

?

Note this is one of the only locations where we lost a bit of window space, in the need to re-construct the framing
around the windows. In other locations, we increased glass space, like in this very badly installed off-the-shelf plastic window in our basement suite:

We also changed the bedroom windows slightly, to make the 1940’s style window slightly more compliant with 2000’s building codes (allowing large enough openings for emergency egress). In this photo you can see the old window next to the new during install. The change in the leading pattern made these windows match the leading in the living room window that is next to it on the façade of the house. They had been mis-matched, probably since the house was built in 1940.

We elected to go with stained wood on the inside. Painted on the outside, with a colour that will hopefully be amenable with our inevitable re-painting of the house in a few years. First, we will probably be doing some work on the painted framing around the windows on the inside, to restore or replace the original wood and complete the look.

In the end, we went with a small, local manufacturer. By doing so, we did not buy “Energy Star” rated windows, and we therefore were not able to take advantage of the Federal rebate program for increasing the efficiency of our house. The process of getting their window assemblies certified as Energy Star is onerous, and would cost tens or hundreds of thousands of dollars. Easy for Fella® or Home Despot®; tough for a guy running a shop with a dozen employees in Burnaby. But we took into account the lack of rebates into our decision making on the windows. The sealed window units have CSA efficiency ratings (We know the energy gains we have received are equal to any other double-glazed low-e argon-filled units). Along with the thermal efficiency of the wood window frames, we are confident our energy rating has gone up.

And we can’t say enough about the beauty of real wood windows in a “semi-heritage” house, or the satisfaction of keeping our money local and being able to see our windows made. We know we have added to the value of our home, not just the efficiency.

So here are some before and after pics.

Windows, part three.

Our window replacement project now complete, it is all over but the Blogging

Really, our choices were vinyl or wood. Aluminum had no real advantage, fiberglass was out of our price range, as were wood-clad or other complicated hybrid window styles.

So we did what most semi-informed consumers do, we delved into the marketplace.

Full disclosure here, Tig and I are bad consumers. By that, I mean we just don’t do the shopping thing well. To say we have high sales resistance is to downplay the problem. It is more that we rarely find anything worth buying. A trip to the Mall is something we avoid at all costs, as it fills us with what Hunter called “Fear and Loathing”. I simply do not enter the retail environment in the month of December. When one of us decides we need to buy something, say, a shirt for work, we steel our resolve and enter the fray, and rarely come out satisfied with our purchases, and more often walk out having bought nothing, realizing that we are not the target market for anything. The modern consumer experience is not designed for us, and we are not designed for it. So why force the issue?

So when Sssssalesmen start coming to our house with quarter-cuts of windows as samples and lots of glossy brochures, to do a few measurements and drop us an estimate with an abstract 5 digit number on it… this is usually a bad experience for all involved. I am not going to name any of the non-successful bidders, they live in their own window-sales Hell, may the Flying Spaghetti Monster have noodly mercy on their souls. Suffice to say, we saw them all, or a wide enough sampling so as to be statistically significant.

We asked a lot of questions, and some were better at answering them than others. The higher-priced people made compelling cases for rigidity of the vinyl, for higher numbers of void spaces in the window frames, for colour options, for muntin designs to match the heritage of our house.

The problem with vinyl becomes pretty clear: if you want a strong structure with lots of void space for thermal efficiency, there needs to be a big, thick window frame. Making that big, thick window frame fit into the pre-existing hole in the house, without getting into expensive and difficult mucking about with stucco and plaster and drywall, you start to lose significant window space. In a 1940 house with relatively small window space to start with, this becomes significant.

Also, vinyl, for all it’s flexibility in design, is kind of ugly. You can have pretty much any colour you want, but white is about the only colour offered (economies of scale limit the ability of these companies to extrude numerous colours locally). The size of some of our double-hung windows limited the ability of their relatively weak frames to support the structure; so many sssssales people pushed us to alternate styles that were less appealing. The design elements (muntin grilles, opening hardware, etc.) were generally cheap-looking and added on, and took more away from the look than they added.

Then there were uncertainties about the install. We had guys promise to do the total install of 19 windows in one day, “no problems”. That is a pretty bold promise to make in a 70 year old house after 2 minutes of looking at a window. It did not instill confidence that they would be taking utmost care or managing unforeseen issues with my best interests in mind. One test of this was to show the ssssssales person that crappy downstairs install I pointed out earlier. The range of reaction we got were telling. Some were aghast that anyone would slap a window in like that, while others basically said, yeah, it doesn’t look too bad, must have been a funny sized opening… you should maybe add a little silicone… . Needless to say, that quick-filtered many proposals (and, perhaps not paradoxically, those were generally the lowest bidders).

Another irritant was never really having an impression of how the windows in their glossy brochure would look in our house. Invariably, the ssssales guy would show up with a ¼ of a window so we could see the void spaces that made them so efficient, but rarely with a complete window. Some offered local references, and this lead to us wandering the streets of Queens Park and West end looking at (not through) innocent people’s windows. We also tried to go to any showrooms or warehouses so we could put our fingers on the actual product, see what it actually looks like. This caused some of the ssssales people discomfort, and some companies really didn’t have a showroom or display product (other than the ¼-cut window with all those wonderful void spaces!) to show. Is it just me, or is asking someone to spend 5 figures on a product they really haven’t seen a normal thing in sales?

After a couple of months, and more than a dozen sales folks, it seemed we were back to Square 1. Exploring the options for wood windows lead us to a couple of fairly large and well-regarded companies, and initial meetings looked good. We got to go to an actual showroom to look at actual windows, install options looked good. Unfortunately, being a relatively small project to some of these companies, it seemed options were limited. Not totally limited, but very cost limited. As these windows were manufactured in far-off places familiar only from Coen Brothers Movies, every little deviation from a “standard” size of install added up quickly. Wood manufacturing does not have the flexibility at the factory level that vinyl does.

Then we found a local company that seemed to get it. They made wood windows specifically for the heritage-home market, and their ssssales guy was also the owner, so he was interested in making us happy instead of his commission. He was also very straight-forward about what was and wasn’t possible in our house, he was realistic about what we could (and should) do. He was incredibly patient taking the time to answer our questions, but didn’t call us every day to try to close the sale. He was also asking a little more than we wanted to spend. But pretty soon in, Tig and I know we found our guy, we just needed to figure out how to get the windows.

Adventures in Composting #1

Green Cone installed

I woke up this morning with an extra hour in the pocket, and found the sun shining. A day for raking leaves, cleaning up the garden, and installing a Green Cone.

As is increasingly common for those fortunate enough to have a yard, I have a compost system. Mine may be a little more complex than others, as you may see here:

In the centre is the two-box compost I built a couple of years ago with some wood and chicken wire. One side is always receiving new materials (non-stinky kitchen scraps, coffee grinds, vegetable cuttings, leaves, grass clippings, a bit of paper, etc), while the other sits fallow, letting the worms do their thing. The idea is that the worms and other soil-making invertebrates will migrate to wherever there is food, moisture, oxygen and warmth. I have an aerator stick I use to stir the fallow side occasionally (to keep things aerobic), and when the worms start to run out of food, they migrate over to the fresh food side.

Every couple of weeks, I take several pounds out of the bottom of the fallow side and stick it in the rolling composter to the right. I add water if it looks like it might need it, worms from the active side if the population looks small, and some fresh (by “fresh”, I mean really rotten and nasty) veggie food to get the worms going. As this bin gets stirred every couple of days, and it is a closed cell, the composting kicks up a notch. What comes out of it after a couple of weeks is nicely textured, and ready to go to the garden. As a bonus, the extra liquid collects in the reservoir underneath, and can be cut for use to fertilize indoor plants. Yum.

Often the production of compost exceeds my garden needs, so I have a little soil pile on the side, wrapped in plastic to keep the rain from leaching all the good nutrients out.

Then there is the space-ship-looking thing over to right. The Green Cone.

I found a fairly sunny part of the back yard, not “full sun”, but warm enough that the rosemary seems happy there, and close enough to the back door to be convenient, but hopefully about 2 fruit-fly-flights from the house, just in case. The first step of installation is digging a 2 ft deep hole with a radius of about 2 ft.

Back-of-the-envelope says 6 cubic feet of dirt weighs about 600lbs. This step took more time than I expected, and gave me a lot of time to contemplate a greater respect for gravediggers, and how mobsters in movies who tell people to dig their own graves must have a lot of spare time on their hands… but I digress.

Once the hole is dug, the rest of the installation took only a few spins of a phillips screwdriver. Once in the ground, the cone is much smaller than it looks prior to installation, much less like a spaceship, and doesn’t look too bad in the garden.

Ready for it’s first load of food.

Good news on the Garbage Front

Like any good Canucks Fan, I am adept at climbing onto, and getting off of, bandwagons . Many sports fans are like that with the home team, excited when they go on a win streak (remember last May and all the moth-eaten Habs Jerseys that came out of the closet for a few hours?) and dejected when the news is less good.

So it is with me and New Westminster City Hall. They build up my faith, only to occasionally knock it down. However, this week you can consider me “on the bandwagon”. I attended the Brow of the Hill Residents Association meeting last night, and the Supervisor of Solid Waste and Recycling for the City was talking about the Clean Green collectors and automated trash collection roll out.

He brought good news: The City is collecting a lot of organics, more than 8 Tonnes a week. The clean green bins are being used heavily, and there is a measurable decrease in the volume of trash going to “garbage” right out of the gate. There were some predictable roll-out issues, but they seem to have a good plan for addressing them, and are dealing with complaints on a house-by-house basis.

Best news I heard: they are considering making smaller Clean Green bins available (essentially, buying some green lids for the 120L bins). This is good, as it was one of the nagging complaints NWEP had during the announcement of the program. For those of us composting and otherwise reducing our trash footprint, it will be nice to not have the 240L Green behemoth in the back yard.

And speaking of my backyard, I also managed to secure a demo Green Cone organic waste digester. I am hoping to get it up and running in my back yard this weekend. Stay tuned, I am really interested to see how well this thing works for the stuff that can’t go into my compost.

They are also ready to swap my (so far, completely unused) 240L garbage bin for a slimmer, trimmer 120L model. I will be taking the trash out for the first time in a month next week.

This is the year.

The fig season

Everything in the garden was a few weeks behind this year, but one thing that was right on time was the fig tree.

We once had an arbourist come in to look at our trees, and he gave me at least one keeper piece of advice. I asked him when Figs are usually ready, and he said “opening weekend of the P.N.E”. For the second year in a row, this prediction has been perfect.

One problem with figs is that there is a very, very small ripe fig window, especially as the P.N.E. rains accelerate the rotting process on the tree. I swear that last year I left for work in the morning and the figs were not ripe, got home from work and they were ripe, went inside, found a bowl, got out the ladder, and went back outside, and they had all rotted off the tree. We needed to catch the magic window this year.

In the spirit of the Vancouver Fruit Tree Project, we sent out an open call on Facebook and through the NWEP, and had a revolving door of people through the back yard on the weekend that the figs were available.

Besides giving the Figs away (and trading some with some friends suffering from a 40lb raspberry crop this year), we also experimented in preservation:

We dried them,

We made jam,
We mixed them with raspberries and blueberries and made more jam,
we ate them right off the tree.

Of course, we were not the only ones in the neighbourhood who enjoyed the fig harvest this year: